Menu


Got your profile rejected by Upwork countless times already? Then, by all means, MOVE ON!
I know that may sound harsh for you but hear me out.
We’ve been saying stuff like “Upwork is the best freelancing platform there is” BUT that doesn’t mean it’s the only way to go to be a successful freelancer!
In fact, we have a lot of students who are thriving in other platforms and just like them, you can also find clients elsewhere without having to go through countless rejection from Upwork.
There’s a whole bunch of freelancing platforms out there just like OnlineJobsPH, Hubstaff, Guru, and Freelancer.com and what you can do is to experiment with these platforms especially if you’re just starting out. Who says you have to settle with only one platform anyway?
Now, if you already have an OnlineJobsPH account, then you should try Freelancer.com next. This is Upwork’s biggest competitor, but unlike Upwork, the sign-up process is quite easy.
If you want a walkthrough of the process, then read on.
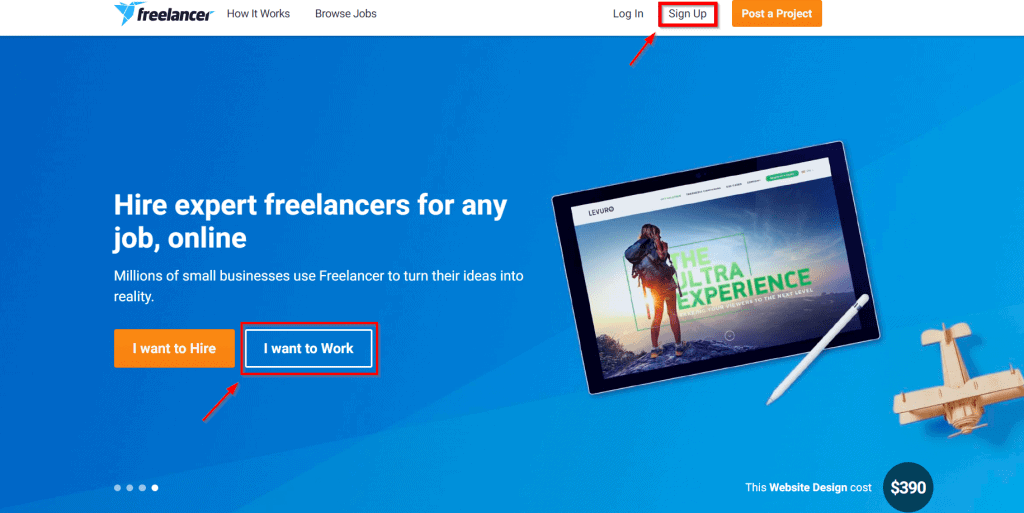
1. Go to https://www.freelancer.com and click on the Sign Up link at the upper-right corner or I want to Work at the lower-left to get directed to a sign-up form.
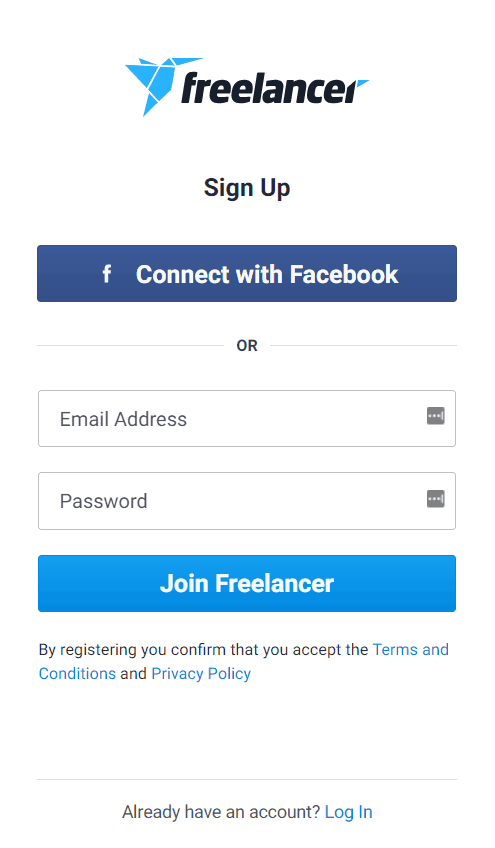
2. Provide an email address and a strong password as your login details.
If you have the time, read the Terms and Conditions as well as the Privacy Policy before clicking on Join Freelancer.
Freelancer also gives you the option to sign up using your Facebook account. Just click the Connect with Facebook button to give it a go.
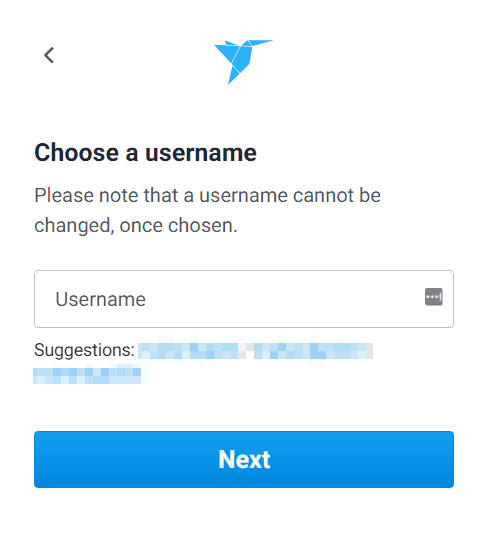
3. After providing an email address and a password, then it’s time to choose a username.
Freelancer offers suggestions for a username, you just have to ignore them though if you already have one in mind. Once done, just click Next.
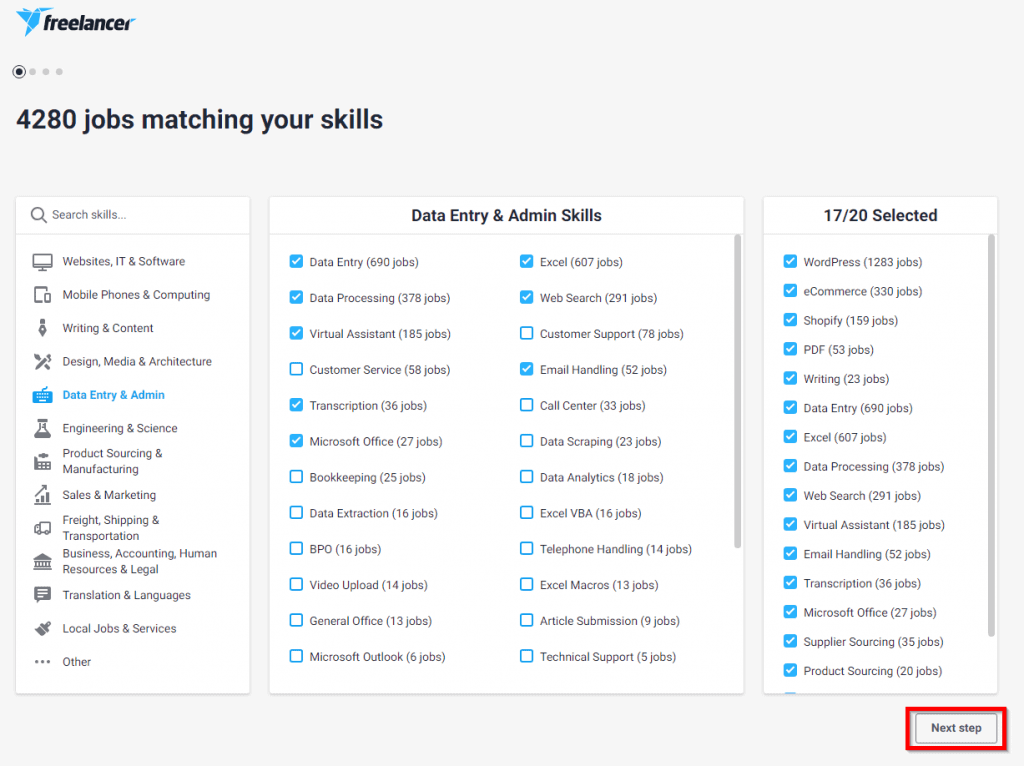
4. Okay! Do not rush this part. Carefully choose your skills since you need to have at least one of the required skills of the project to be able to bid for one. Yes, there is a bidding process, and I’ll discuss more
Freelancer has a user-friendly interface, just click each category and you’ll be able to select your set of skills on the checklist. With the free account, you can only select up to 20 skills, so choose wisely.
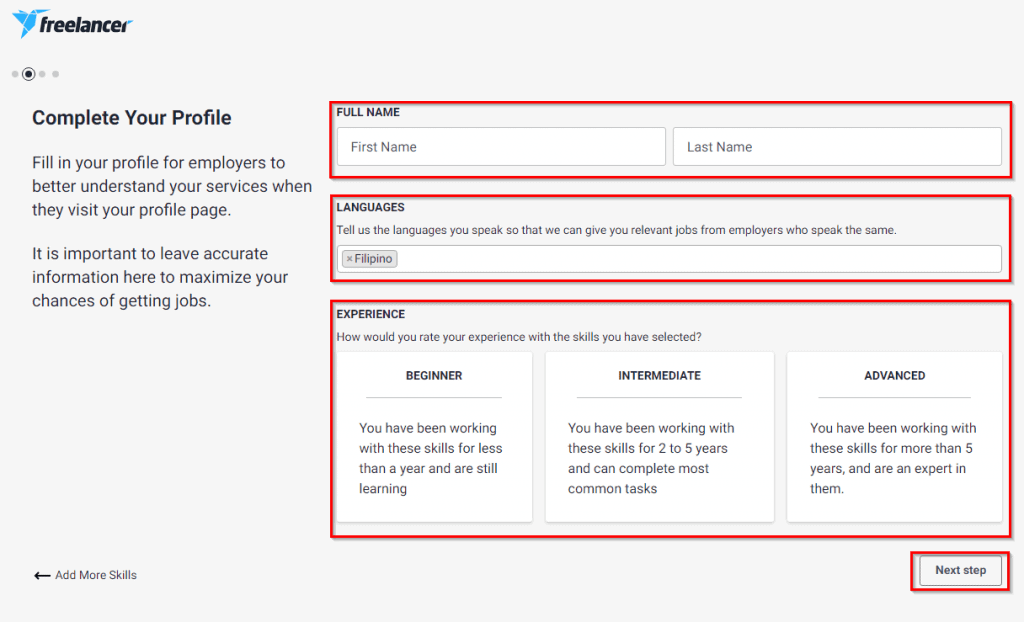
5. Next, fill in the necessary information to complete your profile and then rate your skills by choosing among beginner, intermediate, or advance. Once done, click Next step.
6. Select a payment method. You can simply skip this part and verify your payment method on a later time.
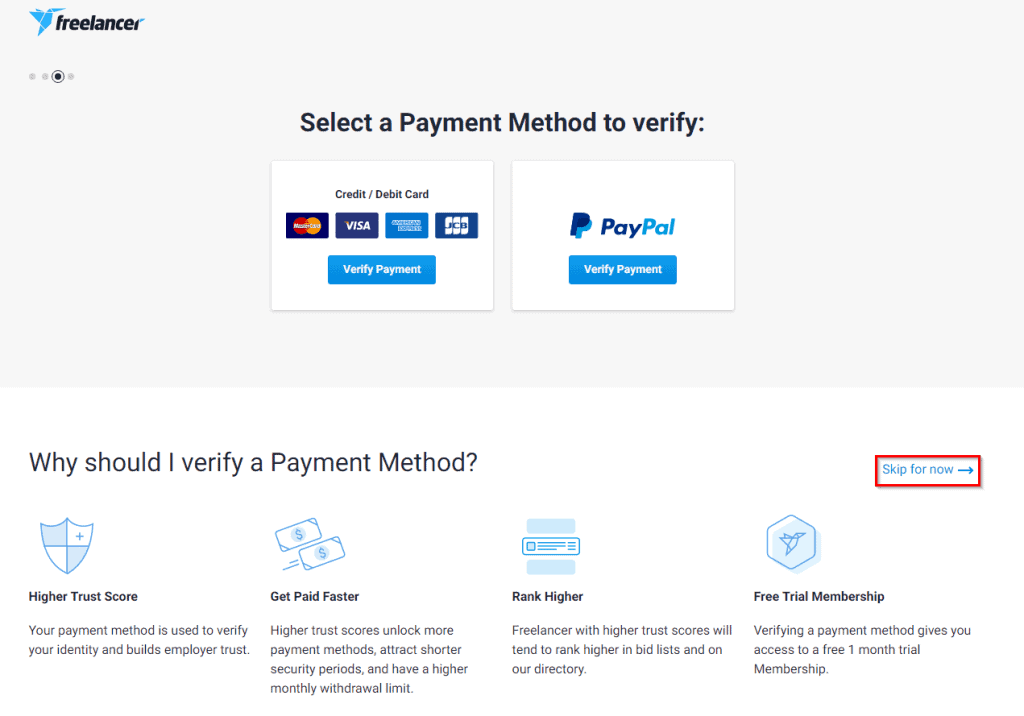
7. After selecting your payment method, you’ll receive an offer for a one Month Free Trial of Plus Membership. You can opt for it by clicking Start Trial Now or you can just look back into it after completing the whole sign-up process.

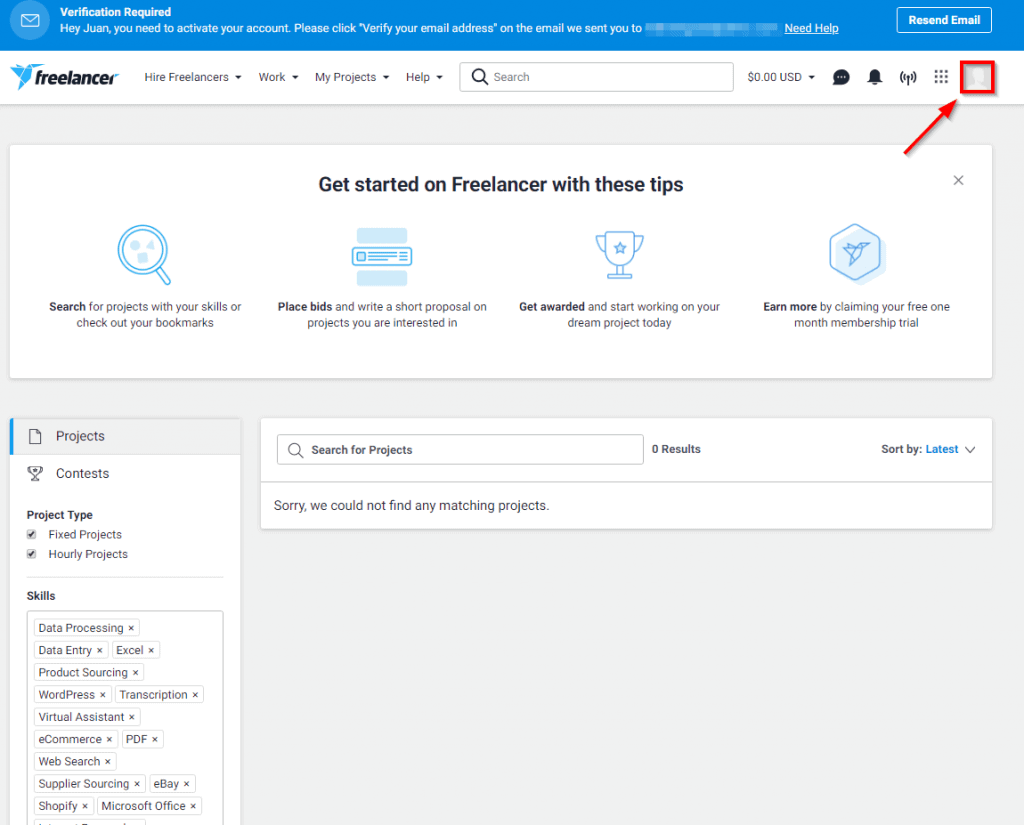
8. Congratulations! You already have a Freelancer.com account.
This time, you just have to create your profile to start bidding for projects. With the free account, you’re only allowed to bid for 8 projects per month, so better make sure that you’ll land a project before you’ve ran out of bids. The key here is to create a very strong profile to impress your clients.
Let’s begin creating one by clicking the image icon on the upper-right.
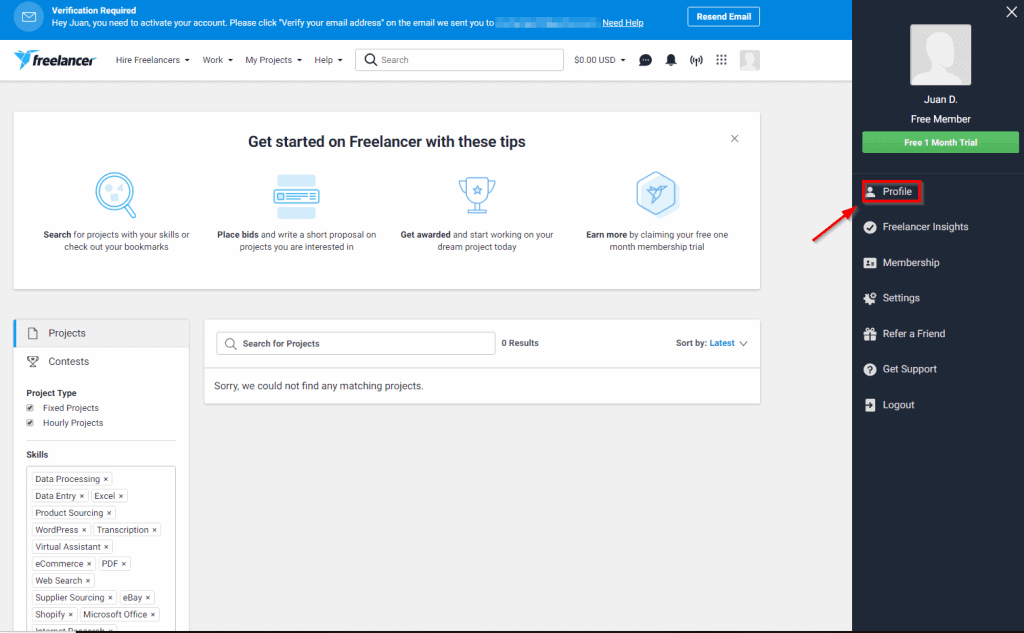
9. Then, click Profile.
10. Next, click Edit Profile.
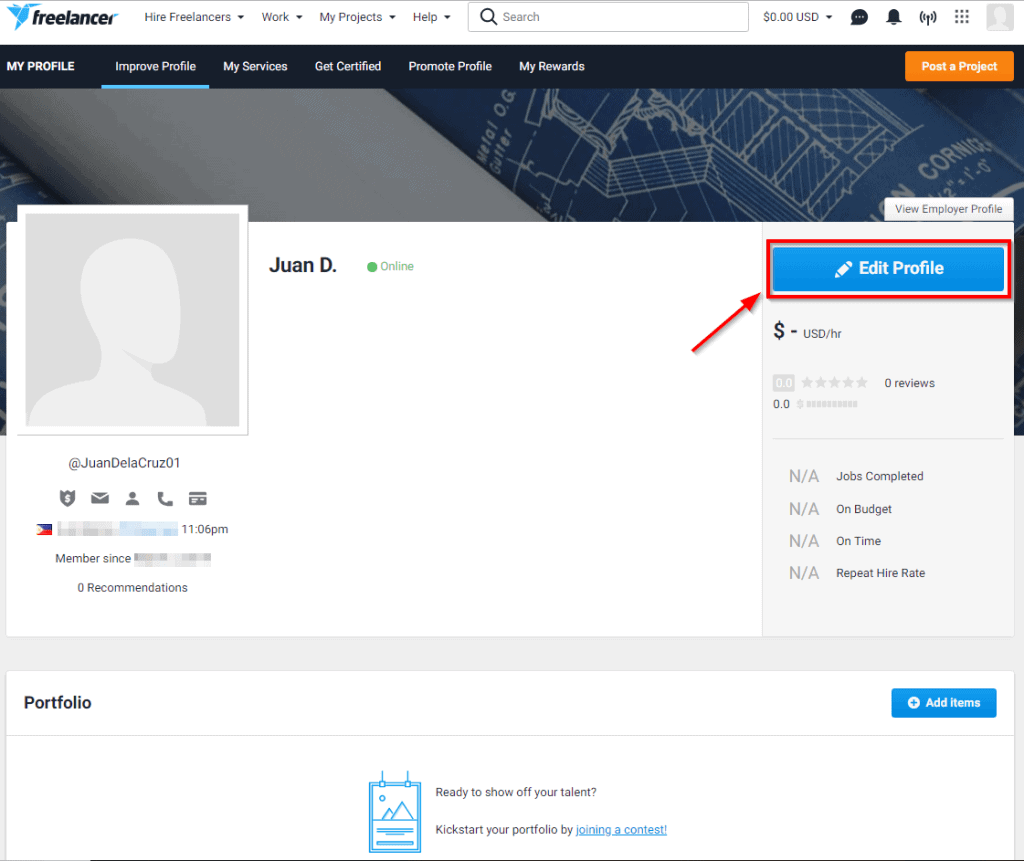
11. Now that you’re on your profile page, you can see that there are still a lot of steps to be done. From here let’s take it one at a time.
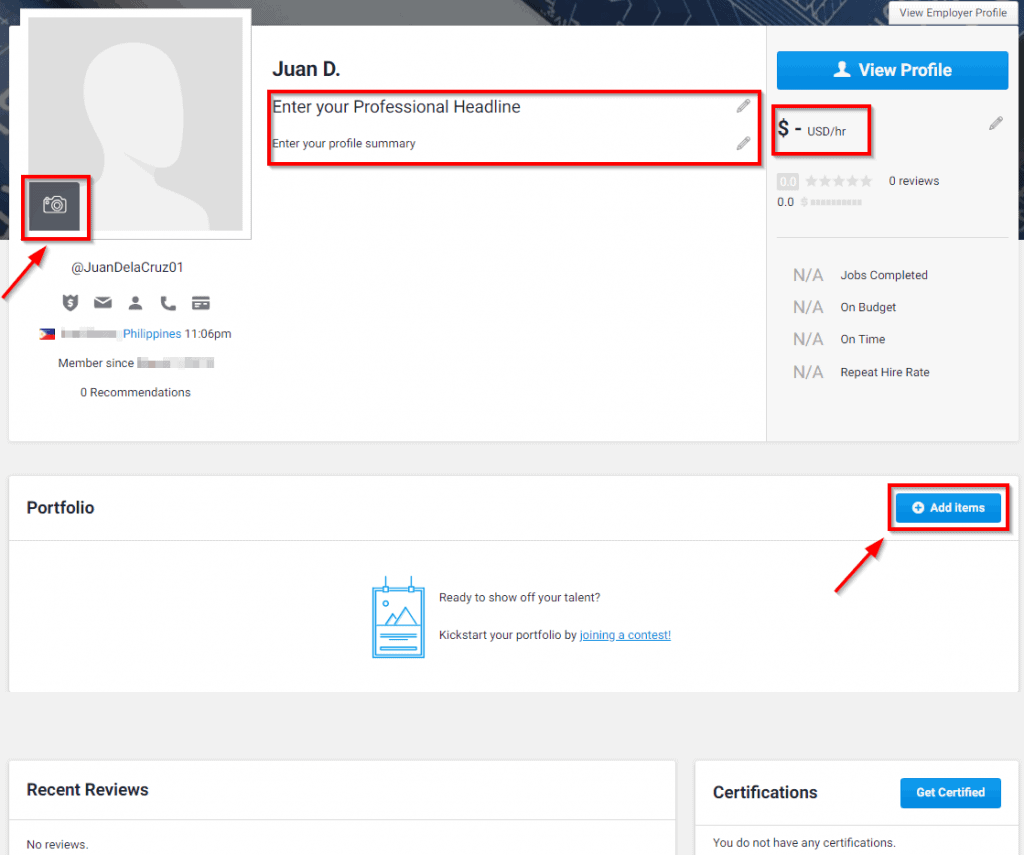
First, let’s add your professional photo. If you’ve already created accounts with other platforms, I hope you know the drill by now– no cropped groufies, wacky shots, or “I woke up like this” photos here.
For examples, check # 12 on our other blog post here.
12. Next, add your professional headline.
Remember to choose one that will make you stand out. Don’t just type the usual “data entry” or “transcriber” or “writer”.
13. Write your profile summary.
Don’t get stuck here! Befriend Google. It helps to do your own research on how to write one.
14. Add your hourly rate.
If you’re just starting out, I recommend starting with $5/hr. Don’t go any lower than that!
15. Add items on your portfolio.
Show your clients what you can do through samples of work you’ve done in the past.
If you’re a newbie, here’s our other blog post to help you out in building your online portfolio.
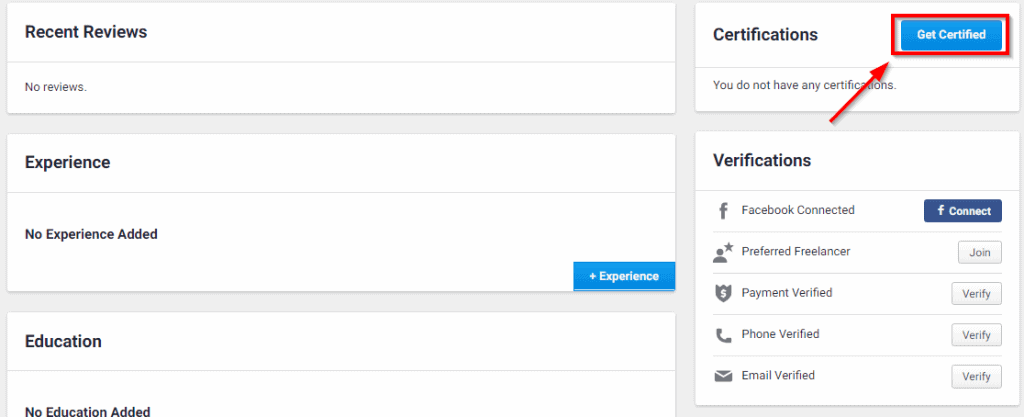
16. Get certified!
One way of proving your skills is through certifications.
While getting exams on Upwork is free, getting certified on Freelancer goes with a fee. This ranges from $5 to $15 depending on the level of the exam you’re taking.
Free or not, these certifications help a lot in getting better freelance projects. Let’s discuss more of this in the bidding process.
Click on Get Certified if you want to get certifications right away.
17. Few more steps and you’re done.
Add your experience, education, and other qualifications. You can add publications as well if you have any.
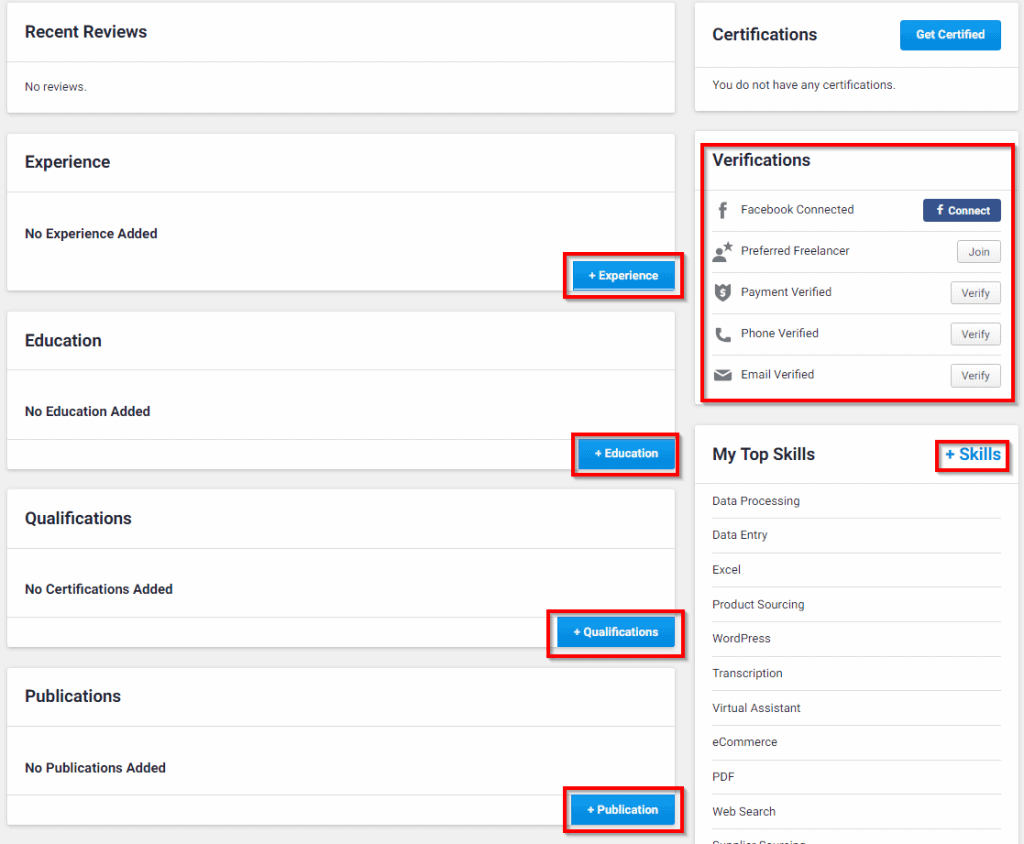
18. Verify your account.
We failed to verify the email address at the start, so let’s have it done this time along with other verification methods. This will only take a few minutes of your time.
Failure to complete each verification will lead to a low trust score, and clients wouldn’t want to work with an untrusted freelancer, right?
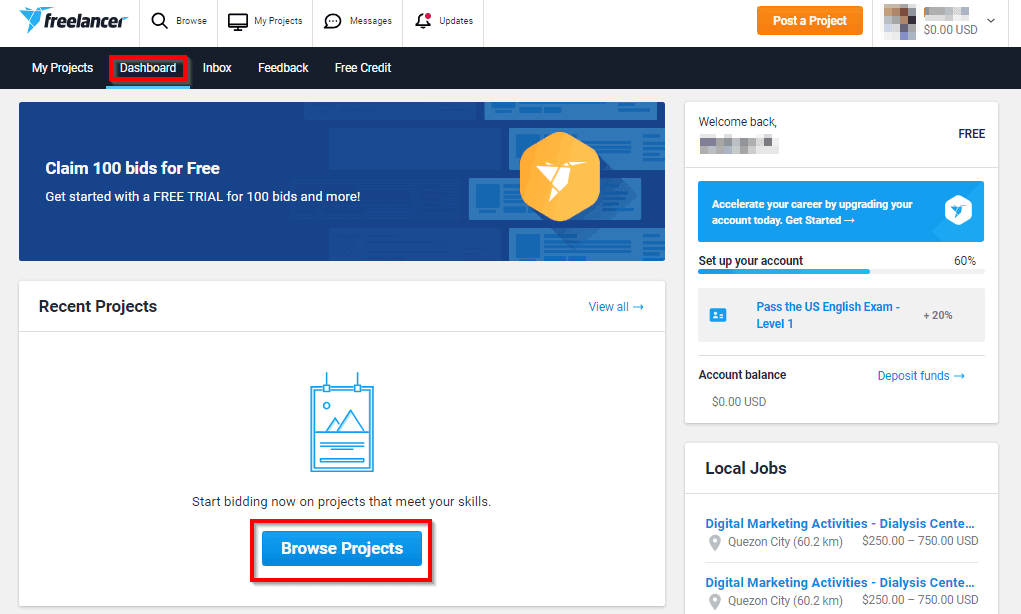
Now that you have a complete profile, let’s try to look for jobs.
1. Login to your account and go to your dashboard.
Click on Browse Projects.
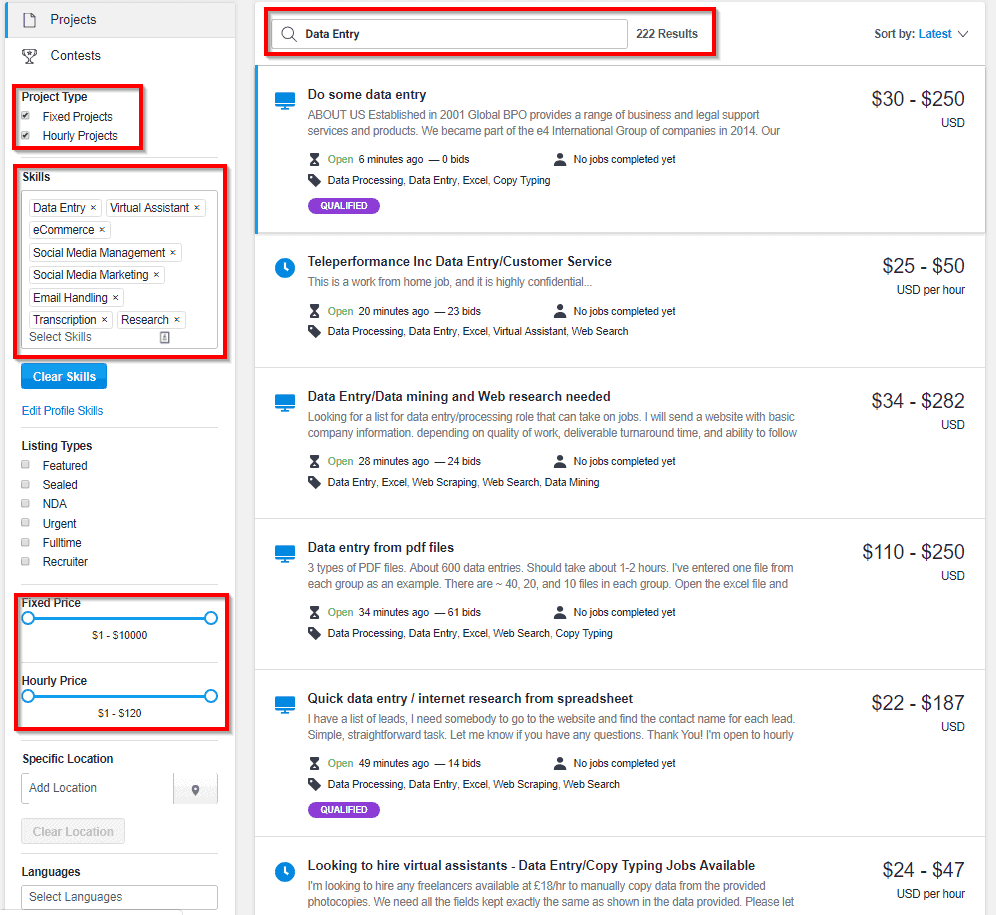
2. Start searching for jobs according to your preference by typing in the search bar. You can also narrow down your job search by using filters such as project type, skills, and project amount.
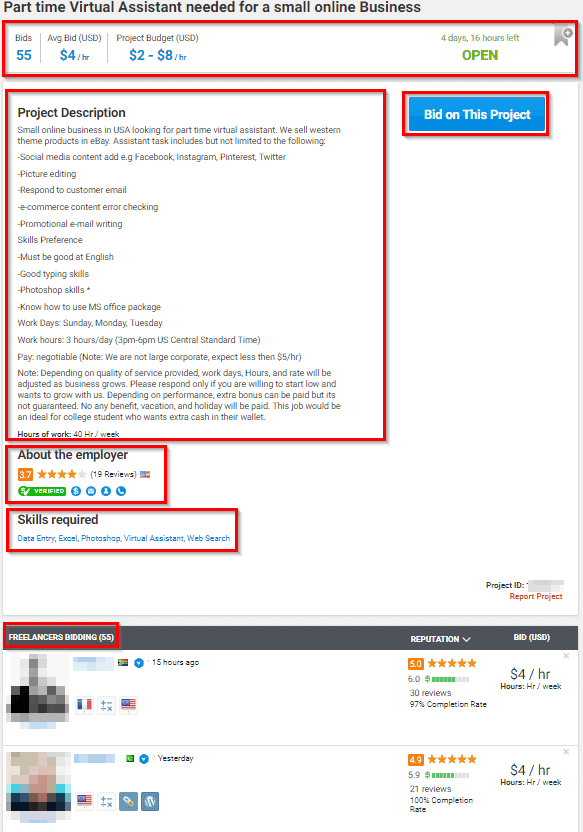
3. Once you open a certain project, you’ll be able to see its details and the bid list for each project.
If you finally found one you would like to work on, then simply click on Bid on This Project.
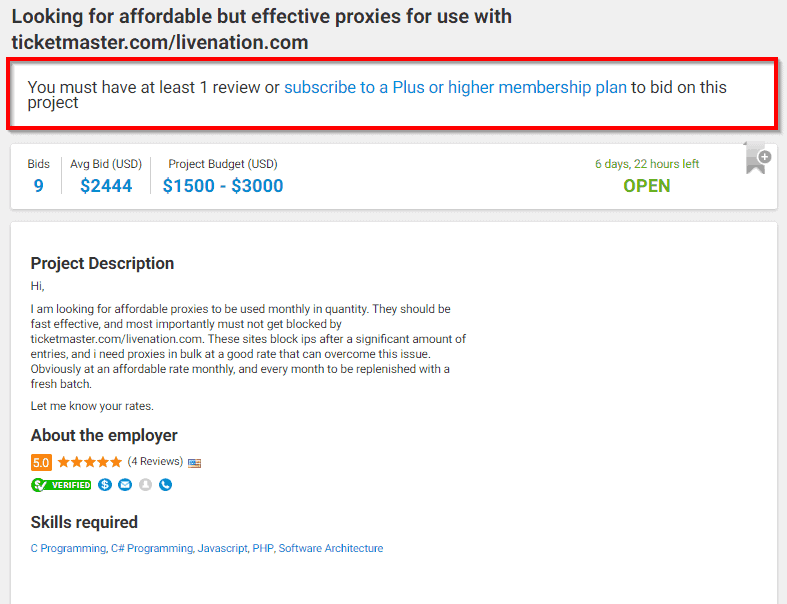
But better make sure you apply for projects with verified employer so as to avoid scams.
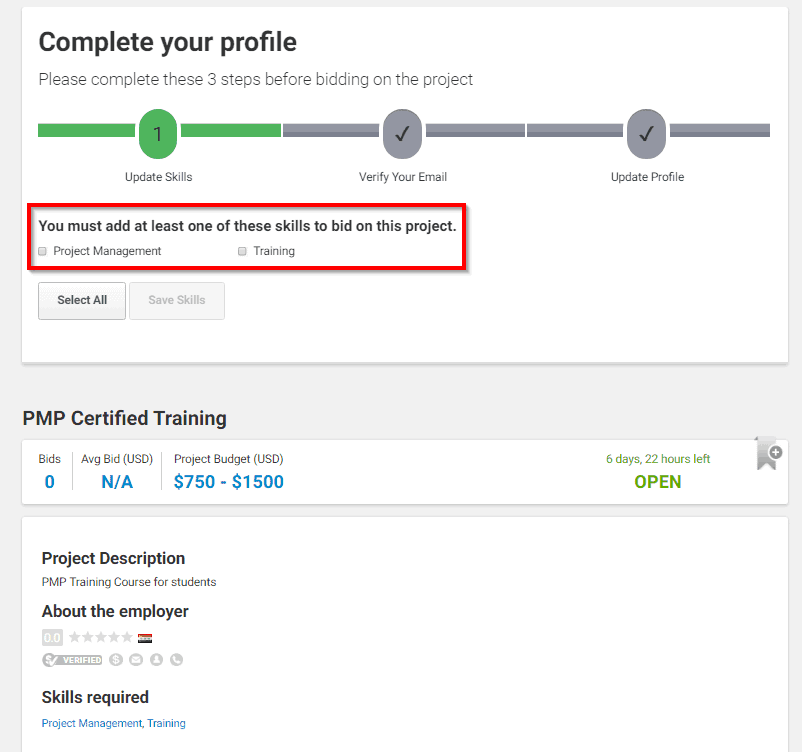
4. Be aware that there are certain projects where you won’t be able to place a bid.
Let me give you three possible reasons.
Reason #1. You don’t have the skills being required on the project.
What to do: Just add at least one of the skills to your skill set, and you’re good to go!
Reason #2: You have not passed a required exam.
What to do: Take an exam and get certified.
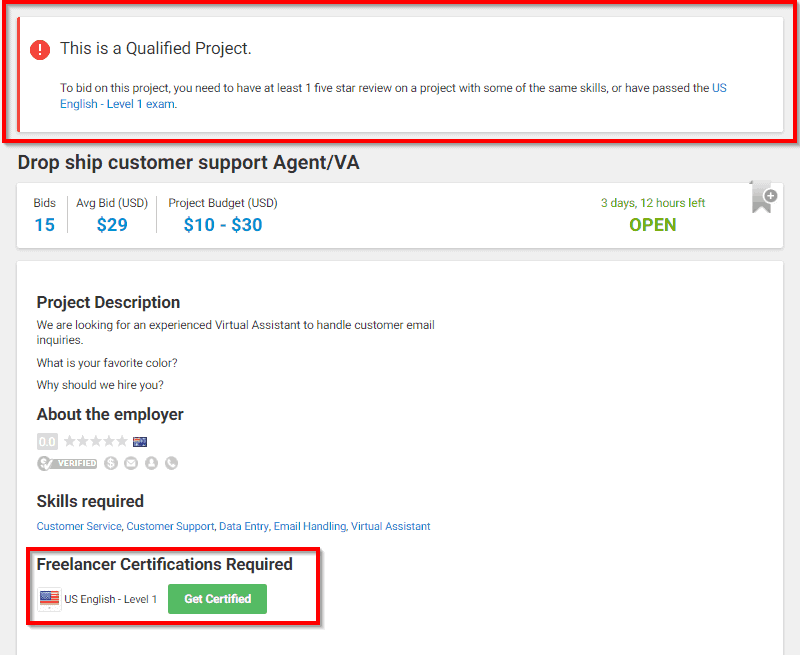
Reason #3: There are restrictions on the project.
What to do: Comply with the requirements.
5. Moving on, let’s say you’ve found an hourly project you’re interested in. Here’s how you should go through the bid proposal.
First, place your hourly rate and weekly limit. Once done, you’ll be able to see how much you’ll be earning weekly and how much is the project fee which will be charged to you each time you get paid.
Second, write your proposal. Always put your best effort in making one.
Need help in writing effective cover letters? Here’s a link to our blog post.
Lastly, review your proposal once more and if you’re satisfied with it, click on Place Bid.
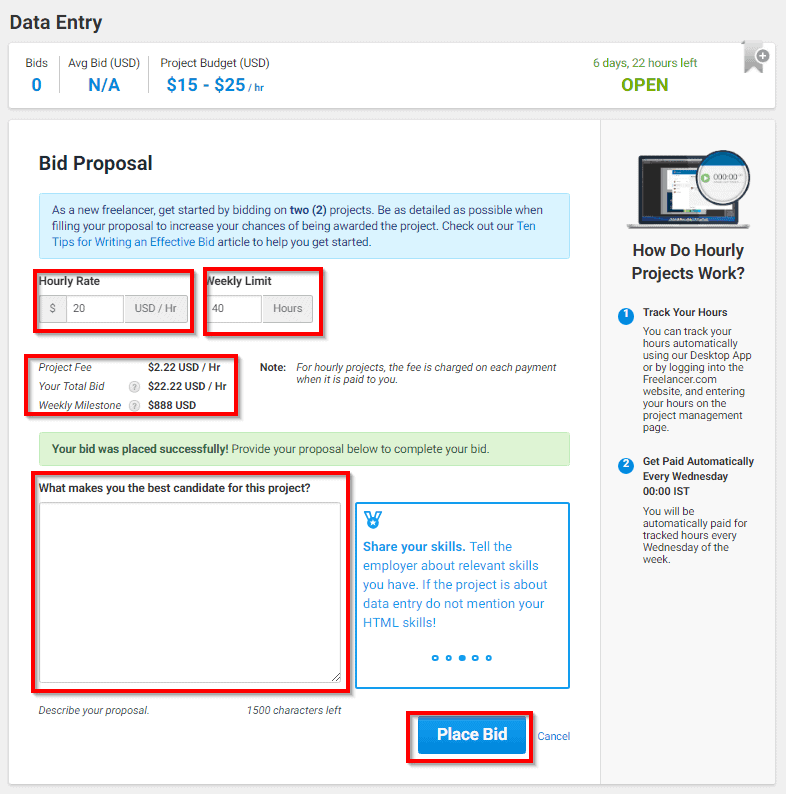
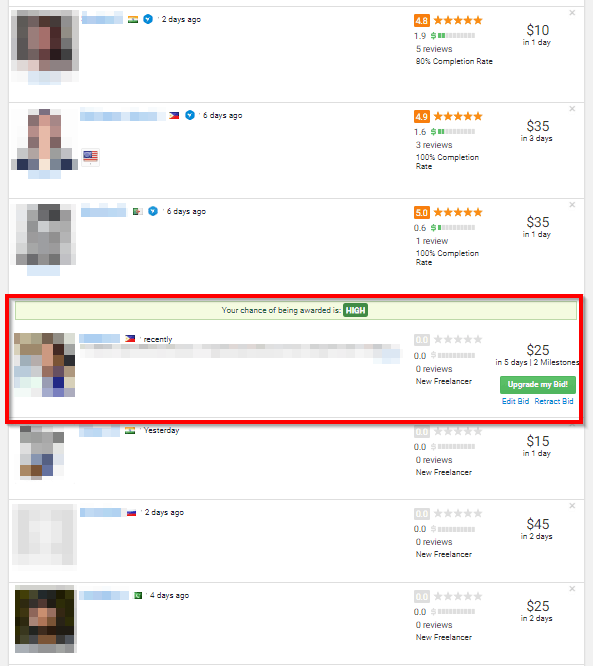
Once you’ve placed your bid, you’ll be able to check on the likelihood of the project being awarded to you, and in the sample below it says, “Your chance of being awarded is: HIGH.”
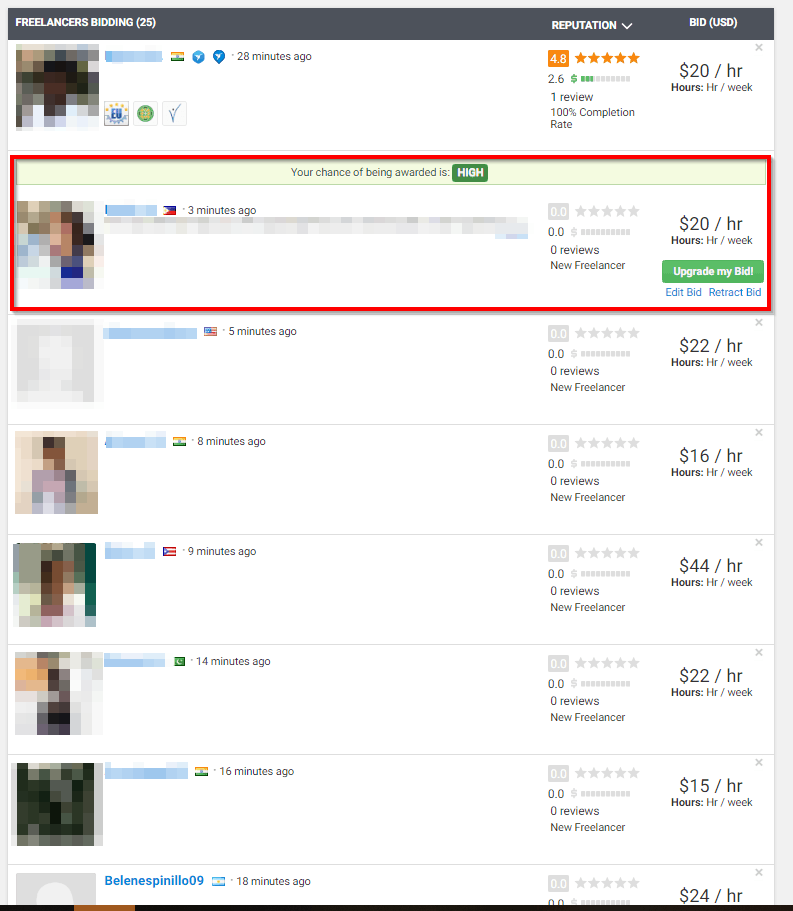
Just a quick note, while you can see the bid list, this does not reflect the actual ranking which the employer sees.
6. On the other hand, here’s how you should go through the bid proposal for a fixed project.
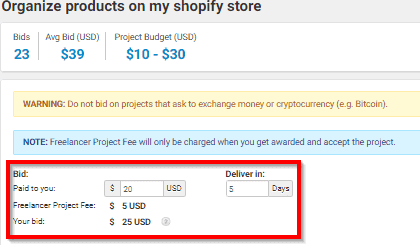
First, place your bid amount, key in how long will it take you to submit the project, and provide the project milestones.
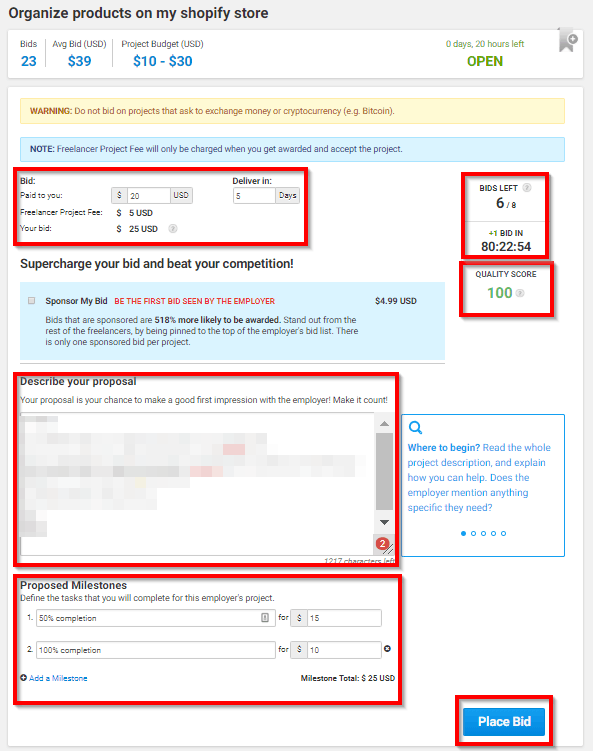
Notice that this bid has a quality score of 100%. The quality score determines how your bid ranks in this project and Freelancer says you should aim for a score of 85 or higher. This translates to a high chance of getting the project.
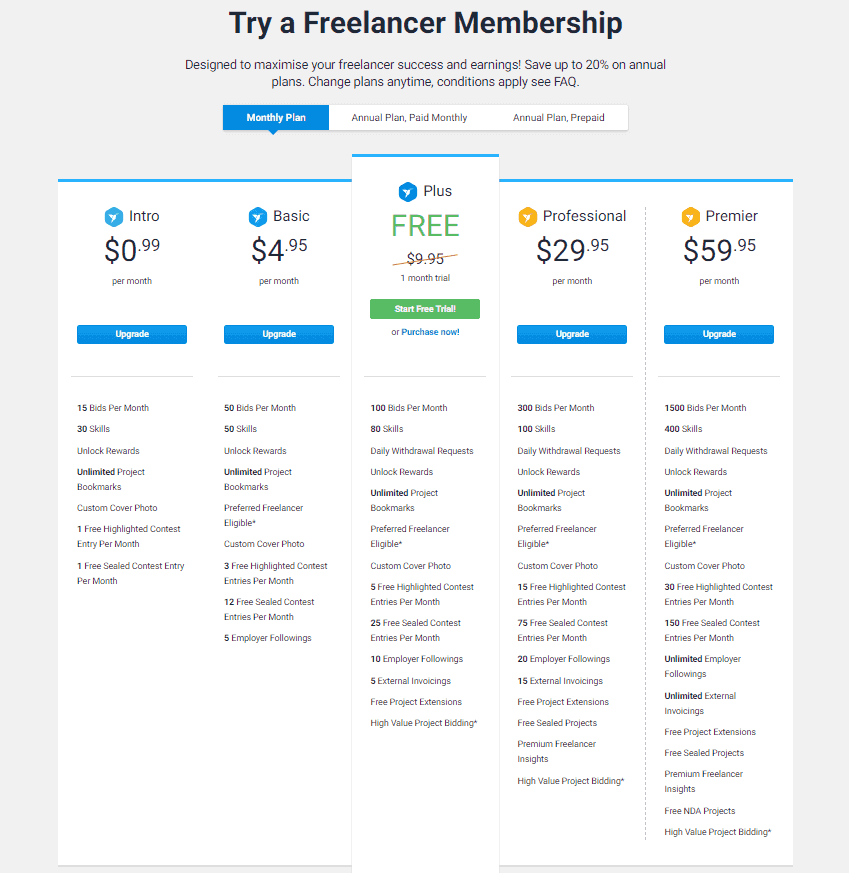
Perhaps you’d also like to note that the number of bids you have in a month and how soon each used bid will be replenished both depend on your membership plan. With the free membership, it only allows you to have 8 bids in a month and is being replenished every 90 minutes. If you’d like to bid on more projects, then you must upgrade your membership. Check out their different plans and see which one would be perfect for you.
Going back, once you’ve placed a well written proposal, just click on Place Bid. You will then be prompted to sponsor your bid so you’ll make it to the top bidders. This will cost you $4.99 though.

But if you really want to work on a certain project, I guess it’s a great deal since it increases your chance of getting the project.
Here’s the freelancer view of the bid list, and again it says that I have a high chance of getting the project. By the way there are 24 bidders in this project as of writing.
One last thing, it is important to know that once you’ve been awarded
Freelancers usually fret upon knowing that an amount has been debited from their account even if the project hasn’t started yet. I’ve seen some rants saying they felt like they’ve been scammed when their Freelancer project didn’t push through considering the project fee has already been charged.
You can avoid this kind of situation by reaching out to your client first to talk about the project details before accepting the offer.
But in case this happens, you can always contact their customer service for them to refund the fee.
There you go!
I hope you’ve already opened your mind on trying different platforms, especially Freelancer.com.
Freelancer may have been charging different fees, unlike other platforms, but these fees are totally reasonable. And if you constantly get your freelance projects in the platform, then it’s just fair that they get paid for their “matchmaking service.”
Excited to start your freelancing journey? Create your account now and get hired using Freelancer.com.
Want a course that will teach you skills you can offer to your client? Get started now by signing up to the VA BOOTCAMP COURSE here.


I do not even understand how I finished up right here, however I believed this
submit used to be good. I don't understand who you might be but definitely you are going to a famous blogger in case you aren't already.
Cheers!
Thanks so much for the blog article.Really thank you! Really Cool.
Fantastic article.Much thanks again. Much obliged.
This very blog is no doubt interesting and besides diverting. I have found many interesting stuff out of it. I ad love to visit it again and again. Thanks a bunch!
I appreciate you sharing this article.Thanks Again. Great.
An outstanding share! I have just forwarded this onto a co-worker who has been doing a little homework on this. And he actually bought me lunch simply because I discovered it for him... lol. So let me reword this.... Thanks for the meal!! But yeah, thanx for spending the time to discuss this issue here on your site.
Everything is very open with a very clear clarification of the issues. It was really informative. Your website is very useful. Thank you for sharing.
The importance of building trust grounded on real experiences with each other. Chrysa Orson Saberhagen
I am so grateful for your blog.Really thank you! Fantastic.
Everything is very open with a very clear explanation of the issues. It was truly informative. Your website is very helpful. Many thanks for sharing!